
1. Introduction
BGMI me sabse common problem kya hoti hai?
Aim unstable rehta hai, close fights me panic hota hai, aur spray control break ho jata hai. Bahut players isko skill issue samajhte hain, lekin reality me problem kaafi baar control layout se start hoti hai.
Agar aap abhi bhi default ya random copied layout use kar rahe ho, to aapka reaction time automatically slow ho jata hai. Close fights me jab ek hi time pe movement, aim, fire aur peek karna hota hai, simple layout fail ho jata hai.
Isi wajah se competitive players 4 finger claw setup use karte hain. Ye setup aapko ek hi time pe multiple actions control karne deta hai, bina unnecessary delay ke.
Is article me aapko milega:
- Pro-level 4 finger control layout ka clear breakdown
- Step-by-step setup guide
- Button size aur placement optimization
- Real gameplay insights jo normally explain nahi kiye jate
Agar aap aim aur reflex genuinely improve karna chahte ho, to ye guide direct practical value degi.
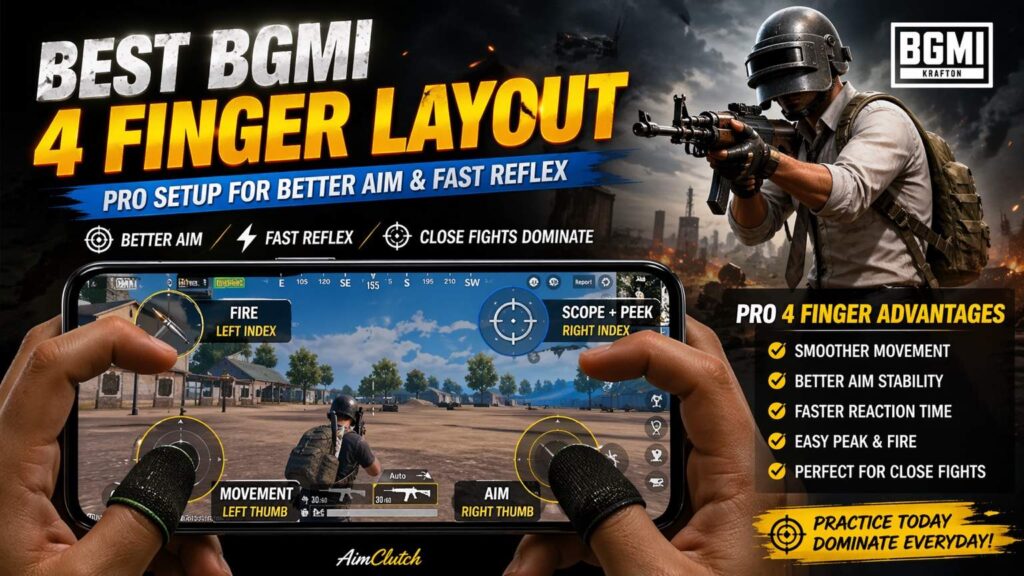
Quick Setup Summary:
- Layout type: 4 finger claw
- Left thumb: Movement
- Right thumb: Aim
- Left index: Fire
- Right index: Scope + Peek
- Practice time: 3–7 days
- Best for: Close range fights, fast reflex, spray control
Note: 4 finger layout koi magic shortcut nahi hai. Ye sirf control aur reaction ko better banata hai. Final improvement practice, sensitivity, device performance aur game sense par depend karta hai.
Result:
Better aim stability + faster reaction in close fights
2. Why Control Layout Matters
BGMI me performance sirf sensitivity ya device par depend nahi karti. Control layout directly aapke reaction time, aim stability aur consistency ko affect karta hai.
Sabse common mistake ye hoti hai ki players layout ko seriously nahi lete. Ya to default use karte rehte hain ya kisi ka layout copy kar lete hain bina samjhe.
Agar layout optimized nahi hai, to problems clear hoti hain:
- Movement aur aim ek sath control karna mushkil hota hai
- Fire karte waqt aim disturb hota hai
- Close fights me delay aur panic increase hota hai
- Peek aur scope smooth nahi hota
Ek optimized layout kya karta hai:
- Har finger ko specific role deta hai
- Reaction time reduce karta hai
- Muscle memory build karne me help karta hai
Simple baat:
Wrong layout = unnecessary disadvantage in every fight.
Isliye control layout ko sirf button placement mat samjho. Ye aapke movement, aim, reflex aur fight confidence ka complete foundation hai.
3. 2 Finger vs 3 Finger vs 4 Finger
2 Finger Setup
Best for: Beginners
Pros: Easy to learn
Cons: Movement, aim and fire ek hi time par handle karna difficult hota hai
3 Finger Setup
Best for: Intermediate players
Pros: Fire button separate ho jata hai
Cons: Peek, scope and aim multitasking abhi bhi limited rehti hai
4 Finger Setup
Best for: Serious and competitive players
Pros: Movement, aim, fire, scope and peek better divide ho jate hain
Cons: Starting me uncomfortable feel ho sakta hai
Conclusion simple hai: agar aap close range fights, reflex aur multitasking improve karna chahte ho, to 4 finger setup sabse practical option hai.
4. Pro 4 Finger Layout Overview
4 finger setup ka main goal hai workload distribute karna.
Finger roles:
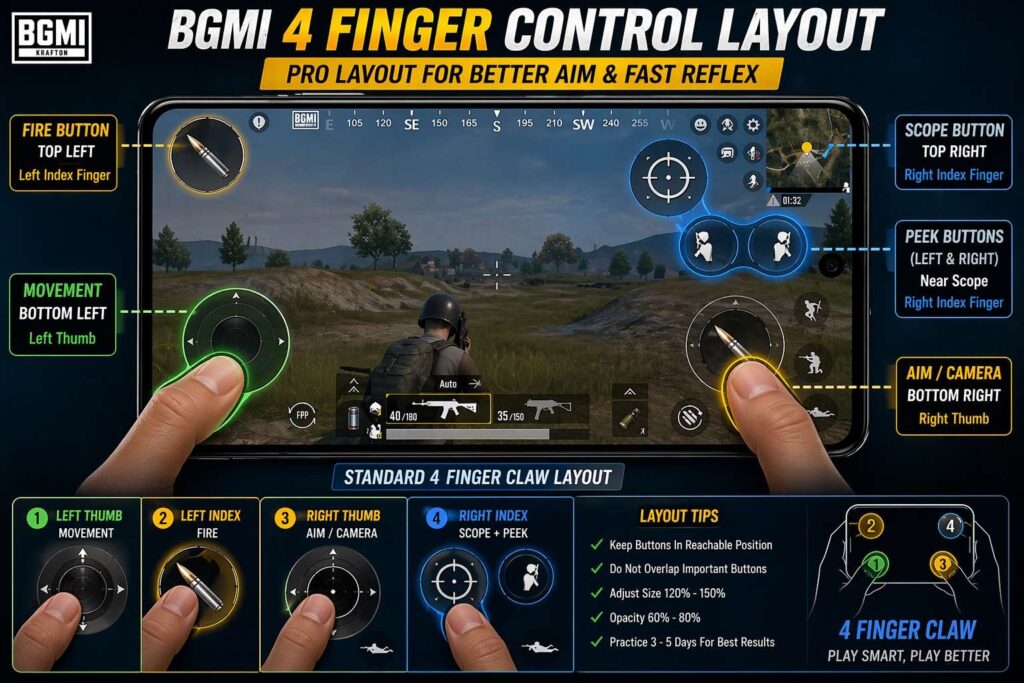
Finger Role Breakdown
Left thumb: Movement and joystick control
Right thumb: Camera movement and aim tracking
Left index: Fire button
Right index: Scope, peek and crouch/jump support
Is system ka fayda:
- Aim disturb nahi hota jab aap fire karte ho
- Peek aur shoot ek sath possible hota hai
- Reaction time naturally fast ho jata hai
Screen placement logic:
- Fire button top left
- Scope + peek top right
- Movement bottom left
- Camera bottom right
Isse hand position natural rehti hai aur long sessions me bhi control stable rehta hai.
5. Step-by-Step Setup Guide
Step 1: Default layout reset karo
Step 2: Fire button ko top left shift karo
Step 3: Scope button ko top right rakho
Step 4: Peek buttons scope ke paas adjust karo
Step 5: Buttons overlap na ho isko ensure karo
Step 6: Crouch, jump and prone buttons ko right thumb ke comfortable range me rakho
Step 7: TDM me 10–15 minutes test karo
Step 8: Jo button miss tap ho raha hai, uska size ya position slightly adjust karo
Important:
Layout ek baar me perfect nahi banta. Pehle basic placement set karo, phir 2–3 din ke gameplay ke baad small adjustments karo.
6. Button Size & Opacity Optimization
Recommended Button Size
Fire button: 120–150%
Scope button: 100–130%
Peek buttons: 90–120%
Crouch/jump/prone: 90–120%
Joystick: comfortable size according to thumb reach
Recommended Opacity
Main action buttons: 60–80%
Less-used buttons: 40–60%
Button size device screen ke hisaab se adjust karo. iPad, tablet aur mobile par same layout copy karna practical nahi hota.
7. Sensitivity + Control Sync (Important Insight)
Bahut log ek mistake karte hain:
layout aur sensitivity ko alag treat karte hain.
Reality:
- High sensitivity + poor layout = unstable aim
- Balanced layout + correct sensitivity = smooth control
Aapka layout aisa hona chahiye ki:
- Aim finger free rahe
- Fire alag finger handle kare
Tabhi sensitivity properly work karegi.
Agar layout change karne ke baad bhi aim unstable feel ho raha hai, to sensitivity ko bhi properly adjust karna zaruri hai. Iske liye aap BGMI Sensitivity Guide read kar sakte ho, jisme custom sensitivity setup step-by-step explain kiya gaya hai.
Real Gameplay Experience (What Actually Changes)
4 finger control layout ka real impact tab samajh aata hai jab aap ise kuch din consistently use karte ho. Theory alag hoti hai, lekin gameplay me jo feel hota hai wo zyada important hai.
Jab maine first time 4 finger setup try kiya, starting me control bilkul natural nahi lag raha tha. Fingers ko new positions me adjust karna padta hai, aur initial matches me miss taps aur confusion normal hota hai. Lekin 2–3 din ke baad ek clear change feel hone lagta hai.
Sabse pehla difference close fights me dikhta hai. Pehle jaha aim aur fire ek sath manage karna difficult hota tha, ab actions separate ho jate hain. Isse reaction time improve hota hai aur unnecessary delay kam ho jata hai.
Real gameplay me sabse noticeable change close fights me feel hota hai. Fire, aim, movement aur scope alag fingers par divide hone ke baad finger shifting kam hoti hai. Isse panic situations me reaction slightly faster aur control more stable feel hota hai.
Starting me miss taps normal hain. Pehle 1–2 din layout uncomfortable feel ho sakta hai, lekin 3–5 din ke consistent practice ke baad muscle memory build hone lagti hai.
Lekin ek important baat clear rehni chahiye: ye instant improvement system nahi hai. Agar aap 1–2 matches ke baad result expect karte ho, to wo realistic nahi hai. Consistent practice ke bina koi bhi layout effective nahi hota.
Short me real experience ye batata hai:
- Initial phase me uncomfortable feel normal hai
- 3–5 din me control improve hota hai
- 7 din ke baad gameplay noticeably stable ho jata hai
Agar aap patience ke saath is setup ko use karte ho, to aim aur reflex dono me practical improvement clearly feel hota hai.
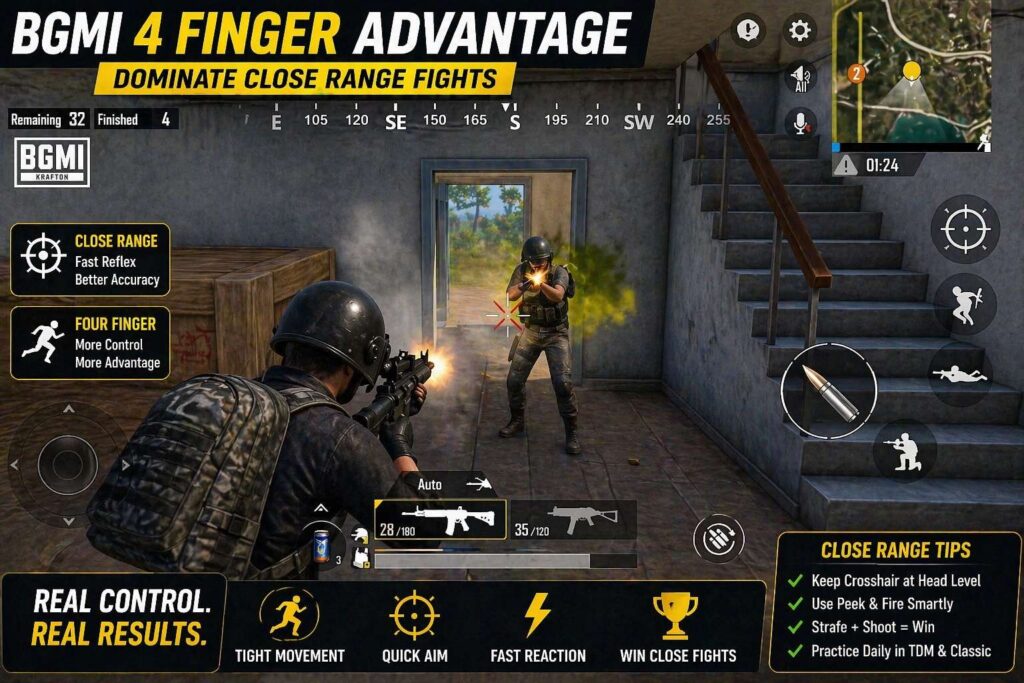
8. Real Gameplay Benefits
4 finger setup use karne ke baad:
- Close fights me reaction fast hota hai
- Spray control stable feel hota hai
- Movement aur shooting ek sath smooth hota hai
Sabse noticeable change:
- Panic situation me bhi control maintain rehta hai
9. Common Mistakes
- Direct pro layout copy karna
Pro layout reference ke liye useful hota hai, lekin apne device size aur finger reach ke hisaab se adjust karna zaruri hai. - Buttons ko bahut close rakhna
Close buttons miss tap increase kar sakte hain, especially close range fights me. - Practice skip karna
Layout change karne ke baad training ke bina result expect karna unrealistic hai. - Har match ke baad layout change karna
Frequent changes muscle memory break kar dete hain. Ek layout ko kam se kam 3–5 din test karo.
Reality:
Layout change ke baad improvement time leta hai.
Close range fights me layout ke saath crosshair placement aur panic control bhi important hota hai. Iske liye aap Close Range Fight Mistakes guide read kar sakte ho.
10. Practice Routine
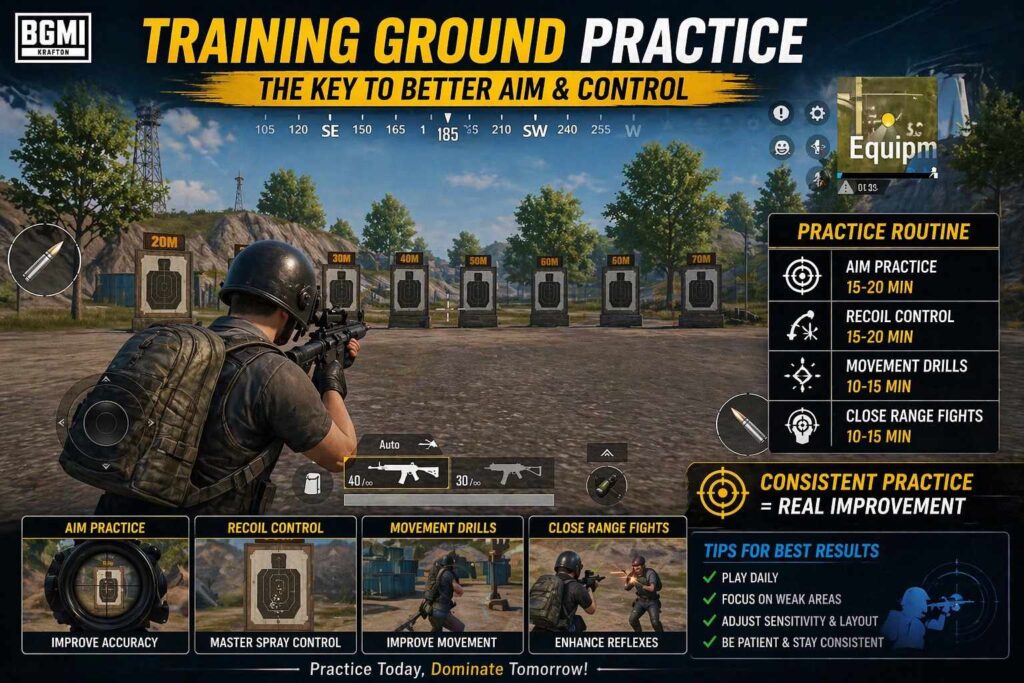
Daily 20-Minute Practice Routine
5 minutes: Training ground me movement + fire practice
5 minutes: Scope open + fire + drag control
5 minutes: TDM me close range fights only
5 minutes: Peek + shoot + cover practice
Day 1–2: Layout adjust karo aur miss taps identify karo
Day 3–5: TDM me reflex aur finger coordination improve karo
Day 7+: Classic matches me use karo aur final adjustments karo
Consistency important hai.
Agar aap complete aim improvement routine chahte ho, to How to Improve Aim in BGMI guide bhi read kar sakte ho.
11. Advanced Tips
- Finger sleeves optional hain. Agar aapko sweaty fingers ya screen friction ka issue hota hai, tab ye helpful ho sakte hain. Lekin sleeves ke bina bhi 4 finger layout effective ho sakta hai.
- Device grip stable rakho
- Screen clean rakho for smooth drag
Small improvements long term me big difference create karte hain.
12. Conclusion
4 finger control layout BGMI me better aim, fast reflex aur stable spray control ke liye ek strong foundation hai. Ye instant shortcut nahi hai, lekin agar aap is layout ko 3–7 din consistently practice karte ho, to movement, firing aur aiming ke beech coordination better feel hone lagta hai.
Perfect layout har player ke liye same nahi hota. Best layout wahi hota hai jo aapke device size, finger reach, sensitivity aur playstyle ke saath comfortable feel ho.
Start simple, daily practice karo, miss taps fix karo aur gradually layout ko optimize karo.
👇
Haan, lekin directly switch karna thoda difficult ho sakta hai. Agar aap bilkul beginner ho, to pehle basic controls samajh lo (movement, aim, shooting). Uske baad 4 finger par shift karo.
Starting me awkward feel hoga, lekin 3–5 din ke andar basic control develop ho jata hai.
Average timeline:
Day 1–2: awkward feel, miss taps
Day 3–4: basic control improve hota hai
Day 5–7: comfortable feel hone lagta hai
Day 10+: natural gameplay
Nahi. 4 finger setup aim ko automatically improve nahi karta. Ye aapko better control deta hai, jisse aim stable rakhna easy ho jata hai.
4 finger layout ka main benefit ye hai ki fire, aim, movement aur scope alag-alag fingers se control hote hain. Isse fight ke time finger shifting kam hoti hai aur reaction fast feel hota hai.
Lekin final improvement depend karta hai:
- Daily practice
- Correct sensitivity
- Device performance
- Crosshair placement
- Panic control
Simple answer: 4 finger layout aim improve karne ka shortcut nahi hai, lekin aim control improve karne ka strong foundation hai.
Haan, aap pro player ka layout reference ke liye copy kar sakte ho, lekin usko blindly use karna best approach nahi hai.
Har player ka device size, screen ratio, finger reach, grip style aur sensitivity different hoti hai. Jo layout kisi pro player ke liye perfect feel hota hai, zaruri nahi ki wahi layout aapke liye bhi comfortable ho.
Best method ye hai:
- Pro layout ko reference ke liye use karo
- Fire, scope aur peek buttons apni finger reach ke hisaab se adjust karo
- 3–5 din same layout practice karo
- Miss taps ya uncomfortable buttons ko gradually change karo
Simple answer: pro layout copy mat karo, pro layout ko customize karo